
There's a common use case in the Kubernetes world, to get your Pods to securely load secrets from a secret manager like IBM HashiCorp's Vault. Since Kubernetes provides an identity that's unique for Pods, the most secure way to access Vault is using that identity. This let's your Vault deployment enable least privileged access based on your Pod's identity, usually limiting access by Namespace, ServiceAccount, or both. There are generally two approaches enabling this function in Vault:
- Kubernetes Authentication - Vault knows how to submit a TokenReviewRequest to an API server to validate a token. This process has the upside of not just validating that the token is still valid and has been properly signed, but that the Pod is still active. If someone were to get the token from a Pod that has since died, Vault would reject the authentication. The downside to this approach is that Vault needs a static ServiceAccount to talk to your cluster, which is a violation of how ServiceAccounts are supposed to be used.
- JWT Authentication - Using an OIDC discovery endpoint, Vault will validate the token's claims without calling the API server. This doesn't need any kind of static token, but also doesn't validate that the ServiceAccount is still valid.
How much of a risk is using JWT only based authentication in Vault? Take a look at some quick checks on how long ServiceAccount tokens are valid for:
- OpenShift - 1 year
- Talos - 1 year
- AKS - 1 year
- EKS - 1 year
- Google Anthos - 1 year
Think about the implications. If an attacker exploits your container to get its ServiceAccount token, even though that token's Pod will certainly be long destroyed, Vault would still accept it!
What are some other risks of using JWT authentication with Vault if a token is lost? Since the token is signed by API server, the only way to keep Vault from accepting that token is to re-key your cluster. That means an upgrade typically, with all the pain that entails.
With that said, you can mitigate this risk by manually projecting a token in your workload with a shorter time to live. We expose this option in our own helm charts, but not many others do. Most just use the defaults.
How can we both simplify and secure our Vault configuration? OpenUnison released a Security Token Service (STS) for Kubernetes in 1.0.43. The initial docs are for using the STS with AWS, but the STS will work with Vault just as well! Before we walk through how to deploy it, let's look at what our Pod will look like.
First, let's assume we're using the Vault injector to create a sidecar that loads our secrets into a file that we can read in. Once everything is configured, it will look like:
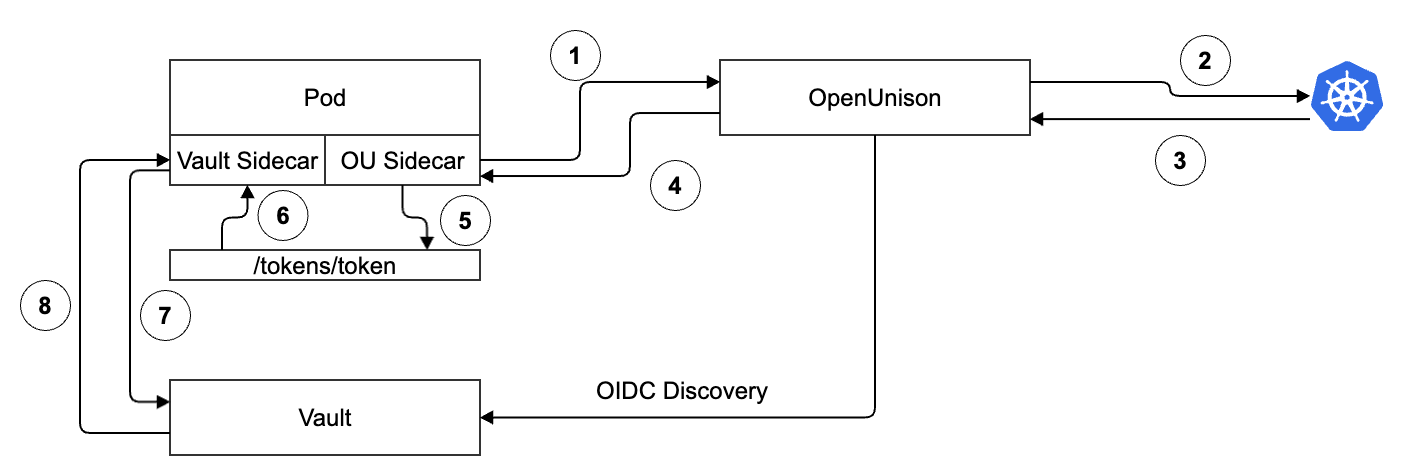
When Vault is configured to trust the STS, it will get the OIDC Discovery documents from OpenUnison. This is an asynchronous process. When the Pod starts up:
- Token Exchange - The OpenUnison sidecar sends your Pod's ServiceAccount token to OpenUnison
- Token Validation - OpenUnison validates your Pod's ServiceAccount token by submitting a TokenReview request
- Token Validated - Assuming the token is still valid, the API server will respond with success. For the token to be valid it must not have expired and the Pod it's associated with must still be running
- Token Response - Now that OpenUnison has validated the Pod's token, it sends a newly signed JWT, scoped to Vault, back to the sidecar
- Token Persistence - The sidecar stores the token in an emptyDir volume that is available to the Vault sidecar
- Vault Sidecar Loads the Token - The emptyDir volume is available to the sidecar, so it will load the token once its available
- Vault Token Exchange - The Vault sidecar uses the token from OpenUnison to get a token from Vault
- Vault Token Response - Vault validates that the token from OpenUnison is valid based on its timestamp and signature from the OIDC discovery endpoint and returns a Vault token
At this point, the sidecar loads your secrets! It's important to note that:
- The tokens are maintained automatically - Both the Vault and OpenUnison sidecars maintain their tokens automatically, making sure they stay refreshed
- Vault Reloads OIDC Discovery - If you need to generate a new key, Vault will reload the discovery data automatically!
- Sidecar Injection - Just as you probably don't add the Vault sidecar manually, OpenUnison's sidecar also gets injected automatically!
Finally, let's look at the token that OpenUnison provides:
We've got everything we need in our JWT to write a policy. We can limit by cluster, by Namespace, and by ServiceAccount!
Now that we know how everything will fit together, the next step is to deploy OpenUnison's STS with Vault.
Deploying the OpenUnison STS with Vault
We've explored how the integration between OpenUnison's STS and Vault works, next we're going to assume a couple of things:
- Vault is Deployed - Deploying Vault is outside the scope of this post, but if you don't have it running locally you can use the scripts from Kubernetes - An Enterprise Guide 3rd Ed as a starting point. It'll launch Vault into your cluster with an Ingress so you can access it from outside of your cluster.
- OpenUnison is Deployed - Take a look at the deployment instructions for how to deploy OpenUnison as your cluster's authentication portal. You don't need to use it for accessing your cluster, but for the scope of this article that's where we'll start.
- You're certificates aren't self signed - In our examples we assume there's an internal CA that signed the certs, but if you have Let's Encrypt that would work too.
Once your ready to start we're going to add two sections to our values.yaml for OpenUnison. First, update the openunison section with the following:
This block tells OpenUnison's built in "mini cert manager" to generate a new keypair that we'll use for signing the tokens for our STS. If you want to use something like the real cert-manager, you certainly can! OpenUnison will just import the keypair instead of trying to generate its own (change openunison.keys[*].replace_ if_ exists to false). Next, add the following to your values.yaml:
The official docs detail all the options, but let's walk through the important ones:
- name -This is the name of the STS and will be used to reference it
- host_in_ openunison - Tells OpenUnison to host the OIDC discovery documents instead of assuming that they'll be hosted on an external site. This means that Vault will go to the issuer/.well-known/openid-configuration to try to load the keys for validating STS calls
- path - This is the URI on OpenUnison to deploy the STS to using OpenUnison's regular host name
- azRules - Here's where you can limit which namespaces and ServiceAccounts can access this STS
- issuer.host - The host name of the issuer, which will be what Vault uses to get the OIDC discovery document
- issuer.keypar - The name of the keypair from openunison.keys[*].name to use for signing tokens
- injector.label - The label and annotation the mutating webhook will look for to inject the OpenUnison sidecar
- injector.explicit_certificate_trust - Tells OpeUnison to get the CA certificate from OpenUnison in a ConfigMap called ouca
The last change tells the OpenUnison operator to update the MutatingWebhookConfiguration with the correct certificates:
The webhook will be named injector-NAME_OF_ THE_ STS. With our changes to our values.yaml completed, let's update OpenUnison using the ouctl command:
The -u flag tells ouctl which charts to deploy before the operator char, while -r tells ouctl which charts to deploy after orchestra-login-portal. Assuming ouctl finishes successfully, the next step is to create an Ingress object for our issuer:
Our Ingress objects directs all traffic meant for vault-sts.apps.192-168-2-115.nip.io to the orchestra pods. We're using cert-manager to issuer a certificate using our internal CA. Once created, you should be able to verify that the issuer URL works to get the OIDC discovery documents:
We're now ready to configure Vault to trust OpenUnison!
Configuring Vault to Trust OpenUnison
With our OpenUnison STS configured, the next step is to configure Vault. This is a 3 step process:
- Create a JWT authentication method - This will tell Vault to trust our STS
- Create a policy - We're going to make sure that ServiceAccounts can only access secrets from their own Namespace
- Create a secret - Secrets will be created in a way that allows us to easily manage access
First, we'll create our authentication method:
The first command tells the vault command where to find the CA certificate for our issuer URL. This is the internal CA we use with cert-manager. The next command configures our authentication method for our issuer. The final command creates a role on the authentication method that binds our JWT to the policy extsecret and allows our claim mappings to be used. We're using the JSON API directly because the claim mapping options in the CLI only supports a single name/value pair to work correctly.
Next, create the policy extsecret for our role. You'll need to get the authentication method's accessor to reference the claims from our tokens:
Finally, we created a secret in secret/data/openunison-cp/test-vault to load. With both Vault and OpenUnison configured, our last step is to deploy a Pod!
Getting Secrets into Our Pods
Both OpenUnison and Vault are configured, the final step is to configure our Pod to get our secret! Based on our policy and location, we need to get an identity that's trusted by Vault with a claim called cluster with the value "openunison-cp" and a claim called namespace with the value "test-vault". That's because our policy is "secret/data/${cluster}/${namespace}/*", and because our data is in "secret/data/openuison-cp/test-vault/config". This allows us to define a single policy for our entire secret repository that limits explicitly what each Namespace's ServiceAccounts can view.
NOTE: We could have gone down to the ServiceAccount name to limit things further, but since Namespaces are the security boundary in Kubernetes you're not really buying yourself any additional security. RBAC can't limit which ServiceAccount within a Namespace can be referenced by a Pod, and while you could enforce it with an admission controller like Kyverno or Gate Keeper you likely should look into breaking up your Namespace at that point.
In a typical Vault injector deployment, our Pod would like something like:
The annotations from line 11 - 25 tell the Vault sidecar injector to add an init-container and an additional container to that will use the Pod's ServiceAccount, for-vault, to authenticate to Vault and get a Vault token. Once authenticated to Vault, the sidecars would call Vault's APIs to create the appropriate secret data. Since we need to get a token from OpenUnison first, we're going to need a new sidecar. We'll add a few annotations:
Let's look at the specific changes:
- New label - This label tells Kubernetes that our Pod wants to get an STS sidecar, this lets us avoid OpenUnison being a bottleneck for EVERY Pod generated on your cluster.
- tremolo.io/* annotations -These annotations tell the STS sidecar injector that we want a token to be generated and that the sidecar should run as the user 100 and the group 1000. This is needed because the Vault sidecars run as this user and group so we'll need to match so the sidecar can read our token.
- New vault.hashcorp.com/* annotations -The STS sidecar creates the volume that stores our token, but the Vault sidecar needs to know where to find it. These lines tell the Vault sidecar injector where to mount the token from and what path to load.
Before deploying our Pod, there's one last step. We need to create a ConfigMap with the OpenUnison CA certificate. The ConfigMap will look like:
Once deployed our Pod will have three containers:
- sts-creds-sidecar - This is OpenUnison's sidecar that is responsible for trading the Pod's ServiceAccount token for a short lived token scoped for Vault. This sidecar is very small and requires less then 30Mb of memory and 5m cores.
- vault-agent-init - Initializes the token exchange for Vault using the STS token
- vault-agent - Maintains the connection
If we look at the logs for the STS sidecar, we'll see it maintaining the token:
The sidecar is extracting the Pod's ServiceAccount and getting a token that's good for 15 minutes, then updating the token as it nears expiration. When OpenUnison get's this token, it validates not only that the token hasn't expired, but that the Pod it's still connected to is still valid. Next, let's look at the resulting token provided by the STS:
Our token is scoped for about 15 minutes and specifically for Vault. It includes the namespace and the cluster name, making policy management easier. There are no static tokens anywhere in the setup, and you can rotate the STS keys at any time without impacting your cluster or other systems.
Getting Help and Support
If you're getting started with OpenUnison and need some help, please don't hesitate to open up an issue on GitHub. We're happy to help! If you want something more private and need a commercial support contract, reach out to us for pricing and help getting up and running.